Tuesday, October 26, 2010

Mini Halloween Cheesecakes


Have you noticed that I really like Halloween? I love all things Halloween...and I especially love creating Halloween-themed goodies to share with my family and friends. These yummy little creations, though, didn't last long enough to be shared. Yes, they're that good. Yes, I admit to being selfish! I've polished off 4 of these goodies in the last 24 hours, Ben has had one and the other three are safely hidden for my consumption later this week! Ok...my mom has talked me into bringing her one tonight when I drop some other things off at her house.

Back to the goodies! I saw these Mini Halloween Cheesecakes from Lindsey of Gingerbread Bagels as part of the Top 9 on Food Buzz a few weeks ago...they caught my attention for a few reasons. First, they're Halloween-themed- Lindsey seems to love Halloween as much as I do. Second, they're cheesecake- and I don't have a whole lot of any experience making cheesecake. Third, they're super easy..the Halloween Oreos are perfect for the crust, and that eliminates the whole crust-phobia thing I have going on.


Mini Halloween Cheesecakes from Gingerbread Bagels, adapted from Martha Stewart


Printable Recipe


I halved the recipe, which gave me 8 mini cheesecakes. Original will make 16.

22 Halloween Oreos
(2) 8 oz packages of cream cheese, softened
1/2 cup sugar
1/2 cup sour cream
2 large eggs, slightly beaten
1/2 teaspoon vanilla extract
Orange gel food coloring

Preheat oven to 275. Line 16 muffin tins with paper liners, and place an Oreo in the bottom of each liner. Crush remaining Oreos using a food processor if you have one, or place them in a ziploc bag and crush them the old fashioned way! In a medium bowl, beat cream cheese with electric mixer until smooth. Add sugar, and continue to mix until combined. Mix in vanilla extract then add eggs and sour cream, mixing well after each addition. Scrape down the sides of the bowl using a spatula, making sure everything is combined. Stir in a small amount of orange gel food coloring, adding a little at a time until the desired color is reached. Add the crushed oreos, and stir to combine.

Spoon batter into liners, filling almost to the top. Bake for 22 minutes, turning pan 180 degrees halfway through the baking time. Remove from oven, and cool completely on a wire rack. Refrigerate for at least 4 hours, preferably overnight, before serving.

Enjoy,and let me know what you think. I can see myself making these often, Halloween or not!


Saturday, October 23, 2010

Ghosts in the Graveyard


This project was an entry in the Nestle's Toll House Spooktacular Baking Activity Contest. The contest requirements were to create a baking activity that could be done as a family using Nestle's Toll House Refrigerated Chocolate Chip Cookie Dough. I decided to do a graveyard, as I really wanted to try my hand at fondant- and ghosts seemed like an easy option!

I'm sad to say that my entry didn't move on to the top ten to be voted on by the public, but I'd still like to share it with you. I had a great time with this project, and was really pleased with the end result. I wasn't able to convince The Cooker Boy to help me with this project, but there are several elements he could have handled.


You will need:

1 Big Batch Roll of Nestle's Toll House Chocolate Chip Cookie Dough
1 can chocolate icing (or make some Chocolate Buttercream, using this recipe)
20 Oreos, finely crushed
1 package white fondant
Candy Pumpkins

Royal icing
2 cups powdered sugar
2 tbsp meringue powder
2 tbsp water
Black Gel Food Coloring

Preheat the oven according to cookie dough package directions. Line a 13x9 baking sheet with foil.Set aside enough dough to make 3-4 cookies. Press remaining dough into a rectangle covering 3/4 of the baking sheet, and place cookies on bottom 1/4 of baking sheet. Bake 14-15 minutes. Remove from oven, and let cool completely.
While cookies are cooling, make fondant ghosts. Knead fondant with hands until nice and pliable.Take a small piece of fondant and roll between hands to form an oval. Press on table to flatten the bottom. Repeat for desired number of ghosts, and set aside. Roll remaining fondant out to 1/16 in thickness. Cut out circles using cookie cutters or drinking glass, depending on size of ghost desired. The radius of the circle should be wider than the oval is tall. Take a circle and drape over each oval, draping to get a nice ghostly shape. Set aside to dry. When dry, use a toothpick dipped in black gel food coloring to apply faces. When not using fondant, keep wrapped in plastic wrap as it will dry out quickly.

When ready to assemble, prepare "tombstones" by using a knife to cut cookies into a tombstone shape. Prepare royal icing by mixing all ingredients except food coloring in a small bowl. Continue mixing until icing has lost its shine, and is at the desired consistency. Add more powdered sugar for thicker icing, more water to thin if needed. Add a small amount of food coloring, and stir until desired gray color is achieved.

Cover tops and sides of "tombstones"  with gray icing, and let dry. Spread a thick layer chocolate icing on big cookie, and top with crushed oreos. Reserve some of the crushed oreos to mound in front of tombstones. 

When tombstones are dry, use a toothpick dipped in black food coloring to write RIP or desired messages. Place tombstones in desired location on big cookie, and prop up with toothpicks if necessary. Mound crushed oreos in front of tombstones.

Place ghosts and pumpkins where desired. I even tried to make fondant bones. Sit back, relax, and enjoy your ghostly creativeness.


Enjoy, and let me know what you think!

Sunday, October 17, 2010

Halloween Cutout Cookies!


It's almost Halloween! I love fall, but I especially love Halloween- even more so since I've become a mom. I've made Halloween treats for The Cooker Boy's Daycare since his first Halloween. Most of the mom's bring goodie bags with more candy..I take personalized cutout cookies for each of the kids. I love cutout cookies as much as I love Halloween, but I have to say that until this recipe, I've never found one that has been both user-friendly as well as tasty. I lucked out BIG TIME when I found this recipe. I found a blog post at The Way The Cookie Crumbles that took 4 different sugar cookie recipes, made them all at the same time and did a side by side comparison. That, my friends, is commitment! I read the comparisons, and decided to go with the recipe that was declared the blogger's favorite- which happened to be her own standby sugar cookie recipe. I have to say that this recipe is now also my standby sugar cookie recipe. It mixed well, rolled well, cut out well, baked evenly, and tasted great! I made one slight change in that I added an extra egg- when I was mixing the dough it didn't seem to want to bind together. It could be that my measurements were off, so I'll list the original recipe. 

This was also my first time using the outline-flood-detail method of decorating the cookies.  I've been a sloppy decorator in the past, but have always wanted to have neatly decorated cookies to share. I found a step-by-step tutorial on Brown Eyed Baker that made this process so easy! This was time consuming, but equally as enjoyable and rewarding. I took these cookies to work, and my coworkers loved them. Needless to say, I can't wait to make these cookies again for my son's Halloween Party at his Daycare..and maybe for work again if my coworkers are nice!

This is why I love Halloween...See that smile? 

Roll Out Sugar Cookies adapted from The Way The Cookie Crumbles

Printable Recipe

2 1/2 cups (12 oz) all purpose flour
1 teaspoon baking powder
1 egg
1/2 teaspoon lemon extract
1/2 teaspoon almond extract
2 sticks unsalted butter, softened
1/2 teaspoon salt
1 cup (7 oz) sugar
1/4 teaspoon lemon zest

Combine flour and baking powder in a medium bowl and set aside. In a large bowl, cream butter and salt with electric mixer on medium speed, mixing until smooth. Add sugar and lemon zest while mixer is running. Continue beating on medium speed until mixture is fluffy. Keep mixer running and add in egg and extracts mixing until combined. Scrape down the sides of the bowl with a rubber spatula. Decrease mixer speed to low, and add in flour slowly and mix until combined. 

Using the rubber spatula or your hands, form a ball with the dough. Place on a length of plastic wrap, and press dough into a 1 inch thick disk. Wrap in plastic wrap and place in refrigerator. Refrigerate at least 2 hours, preferably overnight.

When ready to roll out dough, preheat oven to 375, and prepare baking sheets with parchment paper or nonstick spray. Remove dough from refrigerator,divide in half, and let one half sit at room temperature for 15-20 minutes before rolling out (place the other half back in the refrigerator until 20 minutes before you need it). Lightly flour your work surface, and place half of the dough on the counter. Cover with a piece of plastic wrap, and roll out to 1/4 inch thickness. Cut with a floured cookie cutter, place similarly sized cookies on baking sheets, and bake for 5-9 minutes depending on size of cookies. Don't let the cookies brown on top- pull them out of the oven when the edges begin to brown, and the tops no longer look wet. Reroll the scraps of dough and repeat.

Let cookies rest on baking sheets for a few minutes before transferring them to cooling racks. Cool completely before decorating.

Royal Icing from Brown Eyed Baker

4 cups powdered sugar
2 tablespoons meringue powder
6 tablespoons water

Simple, simple, simple. Dump ingredients into bowl, and mix with electric mixer until the icing loses its shine. About 7 minutes. It will be thick, but if you're doing the outline-flood-detail method, you need it thick to pipe the outlines.

I'm not about to try to recap the excellent tutorial at Brown Eyed Baker on decorating sugar cookies with royal icing. Do yourselves a favor and check it out. There are excellent directions as well as pictures. I'll just post the pictures of some of my finished cookies!


Oh, and The Cooker Boy decided that he needed to be the one to roll and cut the cookies out. I wasn't too keen on that idea. So, I did it while he was napping...and saved him some scraps. I let him roll out the scraps, cut out, and decorate his cookies. Problem solved! 


The Cooker Boy's Cookies
Enjoy, and let me know what you think!!

Friday, October 15, 2010

Loaded Potato Pierogi


I have a confession. I am a carboholic. If they had a 12-step program for people addicted to carbohydrates, I  would definitely benefit (not that I would participate- I'd run in the opposite direction and hide. Denial is my friend.) I love bread..and pasta..and potatoes..and any combination thereof! Naturally, when I discovered Pierogi, I was in a carboholic's heaven! These little polish dumplings have become one of my comfort foods- when I'm sick (like right now) and nothing sounds appetizing, pierogi somehow seem palatable. For those of you who aren't familiar with pierogi, they are little dumplings made of pasta and filled with a creamy potato filling along with any combination of savory fillings. Cheese. Onions. Cheese and Onions. Sauerkraut. Broccoli and Cheese. You catch my drift..just about anything you can combine with cheese and potatoes can go inside a pierogi.

Until recently, I've relied on Mrs. T's frozen Pierogies when I had the urge to overdose on carbs. I never considered making them myself- I've always been a little afraid of any kind of dough. Well, when I first started  reading food blogs on a regular basis, I discovered a post on Brown Eyed Baker about making your own pierogi. This recipe immediately went on  my "to-make" list. The opportunity came my way a few weeks ago to make an attempt of my own, and they turned out way better than I expected! I cheated a little, and used a mashed potato mix instead of whole potatoes (like I've said before..I improvise, and try to cook with what I have on hand). I don't think you could tell at all that the potatoes weren't boiled and mashed here in my kitchen! I was super surprised at how easy these were to put together...part of my fear of dough has been the misconception that dough = complicated. I've tried several recipes lately that are finally clearing my mind of that dirty little thought!

Try these...you'll be amazed at how easy, and yummy, and satisfying they are!

Printable Recipe

Pierogi adapted from Brown Eyed Baker

Makes 24-30 large Pierogi

2 cups flour, plus more for rolling dough
1/2 teaspoon salt
1 large egg
1/2 cup sour cream
1/4 cup butter, softened and cut into small pieces

Filling of your choice- Loaded Potato Filling recipe below
Butter for sauteing
Onions and peppers for sauteing, if desired

Make the Dough.
Mix together flour and salt in medium bowl. Beat the egg in a small bowl, and add flour mixture. Add butter and sour cream and mix well until the dough is no longer sticky. I mixed this by hand with no problem- you can use an electric mixer with a dough hook if you'd like, but be careful not to over mix.  Form a ball with the dough, wrap in plastic wrap, and refrigerate for at least 30 minutes- overnight is fine too. The dough can be refrigerated for a maximum of 2 days.

Make the Filling.

Loaded Potato Filling chez Moi


1 4 oz package Idahoan Buttery Homestyle Mashed Potatoes
2 cups cold water
6 slices bacon, cooked and crumbled
6 ounces shredded cheddar cheese
Salt and Pepper to taste

Prepare potatoes using 2 cups cold water as directed.  Remove from microwave, and stir until creamy. Stir in bacon and cheese, and season with salt and pepper as desired. Set aside half of the potatoes to use as a side dish later in the week!

Assemble Pierogi.
Lightly flour your work surface, and roll out dough until 1/16" thick. Cut circles of dough using a circle cookie cutter, biscuit cutter, or drinking glass. I used a drinking glass, and it gave me good sized pierogi. Place a tablespoon of filling (or less, depending on the size of your dough circles) on each circle, and fold dough over to create a semi-circle. Press edges of dough together using a fork, and a bit of water if the edges won't stick.

Pierogi waiting to be boiled


Prepare Pierogi.
Boil a large pot of water. When at a full boil, drop in a handful of pierogi at a time. Boil for 7-8 minutes, remove from water and pat dry. Repeat with desired amount of pierogi. Melt butter in a large skillet over medium heat. Saute onions and peppers if desired. Add pierogi in a single layer, and turn when nicely browned and crispy.

Enjoy, and let me know what you think!

Friday, October 8, 2010

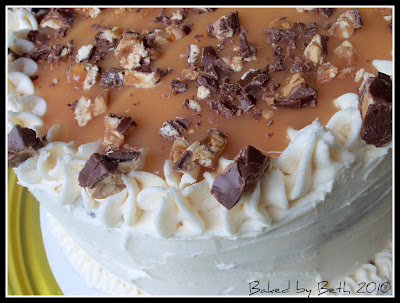
Snickers Cake


Let me just start this post by saying that I'm head over heels in love. I'm in love...with this cake. I'm in love with the moist chocolate cake, with the creamy salted caramel buttercream, and the homemade sea salt caramel that's on top. None of these recipes are new to me, I've made and posted about them before..however, I did make a few small changes that I think made all the difference in the world. In fact, I think these changes elevated this cake from good to AMAZING. The Snickers Cupcakes I made for a bake sale at work a few weeks ago went over so well, that I thought I'd try to convert the cupcakes into a cake. I did, and it worked beautifully. Three days after it was decorated, it is still incredibly moist and perfect. This is a rich cake- definitely not low cal- but in my opinion, I'd rather eat cardboard than low-cal dessert!


The chocolate cake recipe I found on The Novice Chef Blog when I made the Snickers Cupcakes. The only adaptation I made was to use freshly brewed hot coffee instead of boiling water. I am not a coffee drinker, but I love what coffee does to the taste of chocolate when it's used in cake batter. There isn't the slightest bit of a coffee flavor to this cake- it just makes the cake super, super moist!


Printable Recipe: Snickers Cake

Chocolate Cake adapted from Hersheys.com 


2 cups sugar
1 3/4 cups all-purpose flour
3/4 cup cocoa powder
1 1/2 teaspoons baking powder
1 1/2 teaspoons baking soda
1 teaspoon salt
2 eggs
1 cup milk
1/2 cup vegetable oil
2 teaspoons vanilla extract
1 cup freshly brewed hot coffee

Preheat oven to 350 degrees. Prepare (2) 9 inch round baking pans with nonstick spray and circles of parchment paper cut to the size of the pan.

Combine all dry ingredients in a large bowl, and stir with wire whisk until combined.  Add milk, oil, eggs and vanilla and beat with electric mixer on medium speed for 2 minutes. Stir in hot coffee until combined- batter will be runny.

Pour into prepared pans, and bake for 30 minutes or until a toothpick inserted in the center of the cake comes out clean. Remove from oven and cool pans on wire rack for 10 minutes.

If you're going to frost the cake right away, turn cakes out of pans onto wire rack and cool completely.
If not, place the pans in the freezer for 20 minutes, then turn cakes out onto plastic wrap, and wrap each layer in 3 layers of wrap. Freeze until ready to assemble cake.

Sea Salt Caramel from Doughmesstic
* I doubled this recipe for the cake- and for some reason it didn't work as well as when I've made it as follows. However, the caramel tasted great- it was just thinner than normal, which worked to my advantage here!*


1/2 cup heavy cream
1 teaspoon sea salt
1 cup sugar
2 tablespoons light corn syrup

1 teaspoon vanilla
1/4 cup sour cream

Combine cream and salt in a small saucepan and heat over low until salt is dissolved. Set aside.

In a medium saucepan, add sugar and corn syrup. They will not combine well until the sugar starts to melt.
If you have a candy thermometer, cook over high until mixture reaches 350 degrees. If your child thinks the thermometer is a toy (like mine does), cook until the mixture is a light amber color. Remove from heat- the mixture will continue cooking, and the color will darken to a nice caramel color. ( I cooked it to the caramel color the first time, and while it looked great, the caramel had a very bitter taste..I burnt it. Thanks to Susan @doughmesstic for your help!)

Stir in the cream mixture and vanilla, then whisk in sour cream. Let the caramel cool to room temperature, and transfer to an airtight container to refrigerate.


Salted Caramel Buttercream


3 sticks unsalted butter
1 cup sea salt caramel
2 lbs powdered sugar


Cream butter in a large bowl with electric mixer. Stir in caramel until combined. Add sugar in small batches, mixing on medium speed with electric mixer, scraping down the sides of the bowl after each addition. If thicker consistency is desired, add more sugar. At this point, my buttercream was creamy and perfect for spreading. I added a bit of sugar to the icing I had left over to get a good piping consistency.


To assemble cake:


Unwrap one frozen layer of cake, and place on cake board. Level with a serrated knife if necessary. I brush a little of my lovely sugar water (great tip from Bakerella) on top to keep the cake super moist. Spread a generous layer of buttercream on top. I chopped up a snickers and sprinkled it on top of the buttercream, and added a drizzle of caramel.


Top with second layer (trimmed and leveled if necessary), brush with sugar water if desired and apply a light layer of buttercream as a crumb coat to trap any loose crumbs. Place cake in freezer for 15-20 minutes to set crumb coat- it's ready when you can touch the frosting and not have any stick to your finger.


Spread a generous layer of buttercream of top and sides of cake. Pipe on top if desired, and if you're feeling super adventurous, flood the top with caramel before sprinkling on chopped snickers.


Enjoy, and let me know what you think!

Tuesday, October 5, 2010

Cream Puffs


Cream Puffs have been a family favorite for as long as I can remember. From Grammy Grace's cream puff recipe, to the giant cream puffs at Schmidt's Sausage Haus und Restaurant (one of my favorite restaurants ever!), I don't know of anyone in my family who would turn down a cream puff! In fact, when we make trips home to Columbus, if we don't eat at Schmidt's someone at least makes a trip to get Cream Puffs.

I was in the mood to make something a little different the other day, and turned to Tastespotting to get some ideas. Somehow I ended up drooling over cream puffs- so I decided that's what I would make. My previous attempts at cream puffs always turned out ok- the pastry was fine, but I never made a custard filling (I know..lazy foodie!) I always resorted to whipped cream or ice cream. This time I decided I wanted to go all out and make a custard too. I found my recipes through La Fuji Mama's blog- she provided the pastry recipe, and linked to Tartelette for a yummy Custard recipe. I suggest you check out La Fuji Mama's blog for a great step-by-step photo tutorial on how to make the pastry..it is far more simple than I ever would have imagined pastry to be. I can't wait to see what else I can use this recipe for!

I was surprised at how easy both parts of this recipe are...and they turned out some gorgeous and very tasty giant cream puffs! I'll definitely be making these again in the future...you should too!

Printable Recipe: Cream Puffs


Cream Puffs
Pastry from La Fuji Mama
Will make  6 giant, 10 large, 20 medium, or 4 dozen mini cream puffs..whatever you desire!

1 cup water
1 stick butter
1 cup all purpose flour
1/4 teaspoon salt
4 large eggs

Preheat your oven to 400 degrees, and line a baking sheet with parchment paper.

Mix together flour and salt in a small bowl and set aside.

Boil water in a medium saucepan over medium-high heat. When water is at a rolling boil, drop the stick of butter into the pan. Allow the butter to melt. When the butter is completely melted, dump all of the flour into the pan at once, and stir well. Continue to stir, still over the heat, until the dough forms a ball that pulls away from the side of the saucepan.

Remove from heat, and let cool for a minute or so. Add the eggs, one at a time, stirring well after each addition. Continue stirring until dough is nice and smooth.

Drop balls of dough (whatever size you prefer) with a spoon onto parchment paper. For giant or large puffs, bake for 30 minutes or until they are a gorgeous golden brown, and nice and puffy. Reduce baking time for smaller puffs- 22-25 minutes for medium, 17-20 for small/mini. Remove from oven and cool on a cooling rack. I poke a hole into the top of each puff with a toothpick to let some of the steam escape, and to prevent the puffs from collapsing. This recipe doesn't say to do that, but I did anyways.

While the puffs are in the oven, whip up your custard!

Vanilla Custard from Tartelette

2 tablespoons cornstarch
2 tablespoons sugar
1 cup heavy cream *
1/2 cup milk *
3 large egg yolks
1 tablespoon vanilla extract

* the recipe calls for 1 1/2 cups half and half. I didn't have half and half in my fridge, so I tried this combination and it worked well.

Whisk together cornstarch, sugar and egg yolks in a small bowl. Combine milk and cream in a measuring cup, and stir to combine. Add 1/2 cup of the milk/cream mixture to the egg/cornstarch mixture, and mix until smooth. Set aside.

In a small saucepan, heat the remaining milk/cream over medium heat until it boils. Remove from heat, and pour slowly into the egg/cornstarch mixture, whisking while pouring, to temper the eggs. Pour this mixture back into the saucepan, and whisk constantly over medium heat until mixture thickens. When the mixture has formed a nice custard (about 5 minutes), remove from heat and pour into a small bowl. Place a layer of plastic wrap directly on top of the custard to prevent a skin from forming. Let cool to room temperature before refrigerating. Refrigerate for 30 minutes - an hour to thicken even more before filling cream puffs.

Assemble your cream puffs.


You can do one of two things here...you could put the custard in a pastry bag fitted with a filling tip, poke a hole in your puffs, and fill. If you're like me, you'll slice off the top of the puff, put a generous helping of custard on top of the bottom half, top with the remaining slice of puff, and sprinkle with powdered sugar.
The addition of the powdered sugar made these taste dangerously close to the cream puffs I remember from Schmidt's...I'll have to restrain myself from making these every day!!

Everything is better with a drizzle of homemade Caramel!

Enjoy, and let me know what you think!