Showing posts with label Buttercream. Show all posts
Wednesday, August 3, 2011
Rose Cake
I saw a cake like this on I am Baker, and thought it was absolutely gorgeous....as well as something I must try! I found this lovely little cake stand at T.J. Maxx, and needed something to put on it, so I decided to try my hand at this decorating technique. I used a chocolate cake mix to get my cake layers made quickly, and whipped up a batch of Kahlua Buttercream, and went at it.
I prepared this like I would any other layer cake- froze, filled, crumb coated, and frosted. I put the cake in the fridge to set the base layer of frosting, so I could wipe off any mistakes if I needed to (which I did...a few times). Once I got the hang of it, I realized that Amanda of I am Baker is a genius. This is a really simple technique that when finishes leaves you with a stunning cake!
I will send you to Amanda's site, I am Baker, as she has wonderful step by step instructions on how to make this cake. I promise, it IS as simple as it sounds. The rest of her site is amazing as well- I try a lot of recipes I find here. If you find yourself with a few minutes, nose around. You won't be sorry!
Kahlua Buttercream
2 Sticks Unsalted Butter, at room temperature
1 lb powdered sugar
4 tbsp Kahlua or Kahlua flavored creamer
1 tsp vanilla
Cream butter in bowl of stand mixer using whip attachment. Add powdered sugar in small additions, mixing well after each addition. Add vanilla then Kahlua (or creamer) 1 tbsp at a time, using more or less to achieve the desired consistency.
Enjoy, and let me know what you think!
Sunday, April 17, 2011
Busy, Busy Girl!
I've had a busy few weeks, and while I've done a lot of baking I haven't had the time to do much blogging. I am a little behind with my posting, so I thought I'd at least post pics of my latest goodies and will follow up with recipes soon!!
![]() |
Top of Beach Wedding Cake for Monica's Bridal Shower Dinner |
![]() |
Beach Wedding Cake with White Chocolate Shells |
![]() |
Cupcake Toppers for Jason and Monica's Wedding |
![]() |
Block O Groom's Cake for Jason |
![]() |
Cake Table at Jason & Monica's Wedding |
![]() |
Chocolate Covered Strawberry Cake |
![]() |
Chocolate Covered Strawberry Cupcake |
![]() |
Rose Cake |
![]() |
White Cupcakes with Chocolate & Maple Buttercreams Swirled |
Be back soon with recipes!!
Saturday, December 11, 2010
Cookie-Sour Cream Cake
I promised recipes...so here's the cake recipe! As I mentioned in my previous post, the bottom tier of this cake is my favorite Chocolate Cake recipe, which I've used in many posts- most recently in the Snickers Cake. It's a great recipe- and it has turned out a wonderfully moist cake every time I've used it. This time i paired it with the same Vanilla Buttercream I used with the Cookie-Sour Cream Cake in the top layer.
I made cupcakes for the Cooker Boy's birthday celebration at Daycare, and tried a new recipe that turned out really well, the Cookie-Sour Cream Cake. I decided to use that same recipe for the top layer of the birthday cake because it is really delicious and something a little unexpected. It's great paired with Vanilla Buttercream, and I topped this layer with homemade Marshmallow Fondant.
All in all, I was pleased with how this cake turned out. Being my first time making a multi-tiered cake as well as my first time making and working with Marshmallow Fondant, I can't complain. The guests at our party were all impressed, and the Birthday Boy was super excited to get the cake he'd picked out a few weeks earlier.
Cookie-Sour Cream Cake from The New Betty Crocker Cookbook
As is, this recipe makes one 8-inch layer, or 12 cupcakes. Double for a layered cake if desired.
1 cup flour
3/4 cup sugar
1/2 cup sour cream
1/2 cup stick butter, softened
1/4 cup water
1/2 teaspoon baking powder
1/2 teaspoon baking soda
1 large egg
8 cream filled sandwich cookies, coarsely chopped
Pre-heat oven to 350 degrees. Prepare pan with nonstick spray, or fill muffin tin with paper liners.
Combine all ingredients except cookies in large bowl, and mix on low speed with electric mixer for 30 seconds. Scrape down sides of bowl frequently. Increase speed to high, and continue beating for 2 minutes, scraping sides of bowl occasionally. Stir in cookies and pour into pan or fill muffin liners 2/3 full.
Bake cake 30-35 minutes- cupcakes 25-30 minutes- or until cake springs back when touched. Cool 10 minutes, then remove from pan to wire rack.
Vanilla Buttercream from The New Betty Crocker Cookbook
3 cups powdered sugar
1/2 cup stick butter, softened
1 1/2 teaspoons vanilla
1-2 tablespoons milk
Cream butter in large bowl with electric mixer on low speed. Add powdered sugar slowly, beating until combined. Add vanilla and milk, increase speed to high and beat until smooth. If needed, add more milk 1 tablespoon at a time to thin to a spreadable consistency.
Marshmallow Fondant
Instead of trying to rephrase the site I got this recipe from, I'm gonna tell you to just check out Peggy Weaver on What's Cooking America. She has the recipe as well as instructions for working with fondant. I couldn't do this process justice, as I've only made it once. The fondant has a great marshmallowy taste to it, instead of the strange aftertaste I noticed when I used a pre-made version. I'll definitely be trying this again!
Enjoy, and let me know what you think!
Friday, October 8, 2010
Snickers Cake
Let me just start this post by saying that I'm head over heels in love. I'm in love...with this cake. I'm in love with the moist chocolate cake, with the creamy salted caramel buttercream, and the homemade sea salt caramel that's on top. None of these recipes are new to me, I've made and posted about them before..however, I did make a few small changes that I think made all the difference in the world. In fact, I think these changes elevated this cake from good to AMAZING. The Snickers Cupcakes I made for a bake sale at work a few weeks ago went over so well, that I thought I'd try to convert the cupcakes into a cake. I did, and it worked beautifully. Three days after it was decorated, it is still incredibly moist and perfect. This is a rich cake- definitely not low cal- but in my opinion, I'd rather eat cardboard than low-cal dessert!
The chocolate cake recipe I found on The Novice Chef Blog when I made the Snickers Cupcakes. The only adaptation I made was to use freshly brewed hot coffee instead of boiling water. I am not a coffee drinker, but I love what coffee does to the taste of chocolate when it's used in cake batter. There isn't the slightest bit of a coffee flavor to this cake- it just makes the cake super, super moist!
Printable Recipe: Snickers Cake
Chocolate Cake adapted from Hersheys.com
2 cups sugar
1 3/4 cups all-purpose flour
3/4 cup cocoa powder
1 1/2 teaspoons baking powder
1 1/2 teaspoons baking soda
1 teaspoon salt
2 eggs
1 cup milk
1/2 cup vegetable oil
2 teaspoons vanilla extract
1 cup freshly brewed hot coffee
Preheat oven to 350 degrees. Prepare (2) 9 inch round baking pans with nonstick spray and circles of parchment paper cut to the size of the pan.
Combine all dry ingredients in a large bowl, and stir with wire whisk until combined. Add milk, oil, eggs and vanilla and beat with electric mixer on medium speed for 2 minutes. Stir in hot coffee until combined- batter will be runny.
Pour into prepared pans, and bake for 30 minutes or until a toothpick inserted in the center of the cake comes out clean. Remove from oven and cool pans on wire rack for 10 minutes.
If you're going to frost the cake right away, turn cakes out of pans onto wire rack and cool completely.
If not, place the pans in the freezer for 20 minutes, then turn cakes out onto plastic wrap, and wrap each layer in 3 layers of wrap. Freeze until ready to assemble cake.
Sea Salt Caramel from Doughmesstic
* I doubled this recipe for the cake- and for some reason it didn't work as well as when I've made it as follows. However, the caramel tasted great- it was just thinner than normal, which worked to my advantage here!*
1/2 cup heavy cream
1 teaspoon sea salt
1 cup sugar
2 tablespoons light corn syrup
1 teaspoon vanilla
1/4 cup sour cream
Combine cream and salt in a small saucepan and heat over low until salt is dissolved. Set aside.
In a medium saucepan, add sugar and corn syrup. They will not combine well until the sugar starts to melt.
If you have a candy thermometer, cook over high until mixture reaches 350 degrees. If your child thinks the thermometer is a toy (like mine does), cook until the mixture is a light amber color. Remove from heat- the mixture will continue cooking, and the color will darken to a nice caramel color. ( I cooked it to the caramel color the first time, and while it looked great, the caramel had a very bitter taste..I burnt it. Thanks to Susan @doughmesstic for your help!)
Stir in the cream mixture and vanilla, then whisk in sour cream. Let the caramel cool to room temperature, and transfer to an airtight container to refrigerate.
Salted Caramel Buttercream
3 sticks unsalted butter
1 cup sea salt caramel
2 lbs powdered sugar
Cream butter in a large bowl with electric mixer. Stir in caramel until combined. Add sugar in small batches, mixing on medium speed with electric mixer, scraping down the sides of the bowl after each addition. If thicker consistency is desired, add more sugar. At this point, my buttercream was creamy and perfect for spreading. I added a bit of sugar to the icing I had left over to get a good piping consistency.
To assemble cake:
Unwrap one frozen layer of cake, and place on cake board. Level with a serrated knife if necessary. I brush a little of my lovely sugar water (great tip from Bakerella) on top to keep the cake super moist. Spread a generous layer of buttercream on top. I chopped up a snickers and sprinkled it on top of the buttercream, and added a drizzle of caramel.
Top with second layer (trimmed and leveled if necessary), brush with sugar water if desired and apply a light layer of buttercream as a crumb coat to trap any loose crumbs. Place cake in freezer for 15-20 minutes to set crumb coat- it's ready when you can touch the frosting and not have any stick to your finger.
Spread a generous layer of buttercream of top and sides of cake. Pipe on top if desired, and if you're feeling super adventurous, flood the top with caramel before sprinkling on chopped snickers.
Enjoy, and let me know what you think!
Wednesday, September 22, 2010
Lemon Triumph Cake
One of the items on my 'To-Bake' list was a Lemon Triumph Cake I spotted over on Willow Bird Baking. The recipe seemed challenging, as there were several components to make. Making cake and buttercream isn't new to me, but I'd never made a Lemon Curd or Mousse before! I decided I'd put the recipe on my 'To-Bake' list and give it a try when I had a reason to make another cake.
While I was at work last Saturday, I got a text from one of my good friends asking if I was working Sunday. I was, and I asked why...come to find out, she was offering to pay me to bake a cake for a party at her husbands office on Monday. She told me to forget it since I had to work, that she'd make something, but it wouldn't taste as good as something I could make. Awww...Well, as it turned out the cake wasn't needed until Tuesday, so I was able to make it. When I asked what kind of cake her husband wanted, she said vanilla and lemon. Perfect excuse to make the Lemon Triumph Cake!
This is a time-consuming recipe. I am a natural born procrastinator. My argument for my procrastination is that it forces me to come up with something great the first time around! If you're smart, you'll do like Julie on Willow Bird Baking suggests and make this cake in stages. If you're like me, you'll do it in one morning, running errands while each element is cooling or setting up!
I altered the recipe a bit- I prefer white cake with lemon flavored icing or filling, so I used my standby white cake recipe. I did use the Lemon Curd and Mousse recipes straight from WBB. The icing was my own lemon buttercream.
All in all, I think I could have decorated the cake a little better, but from what I hear it tasted fantastic! Can't wait to try it again and have a bite myself.
Lemon Triumph Cake adapted from Willow Bird Baking
Lemon Curd:
6 tablespoons unsalted butter, softened
1 cup sugar
2 large eggs
2 large egg yolks (save the whites for later)
2/3 cup fresh lemon juice
1 teaspoon fresh lemon zest.
Using an electric mixer, beat butter and sugar in a large bowl for about 2 minutes. Add eggs and yolks, one at a time, beating well after each addition. Beat for about a minute after the last egg is added. Add lemon juice and mix well. The mixture will appear curdled- this will disappear when heated.
Transfer the mixture to a heavy saucepan and cook on low heat until smooth. Increase the heat to medium and cook, stirring constantly, until the mixture thickens and reaches 170 degrees on a candy thermometer. Don't let this mixture boil! Remove from heat, and stir in lemon zest. Transfer to a small bowl, and place a layer of plastic wrap directly on the surface of the curd- this will prevent a skin from forming. Place in refrigerator- curd will thicken as it cools.
White Cake adapted from Sporkorfoon, who adapted it from Cook's Illustrated
2 1/4 cups cake flour
1 3/4 cups granulated sugar
4 teaspoons baking powder
1 teaspoon table salt
1 cup milk (original calls for whole, I used 2%)
3/4 cup egg whites (6 large or 8 medium)
1 teaspoon vanilla
12 tablespoons unsalted butter, softened but still cool
Preheat oven to 350 degrees. Prepare pans- will make 2 9-inch layers. Mix dry ingredients in large bowl with a wire whisk, and set aside. Pour milk, egg whites and vanilla into a smaller bowl and whisk until combined. Add butter to dry ingredients, and mix with electric mixer on medium speed until mixture resembles crumbs. Add all but 1/4 cup of milk mixture, and beat on high speed with hand mixer (medium if you're a bigshot with a stand mixer) for 1 1/2 minutes. Scrape down sides of the bowl, add the remaining milk, and beat for an additional 30 seconds.
Pour into pans or prepared muffin tins, filling 2/3 of the way full. Bake cakes at 350 for 23-25 minutes. Remove from oven, and let cool in pans on wire rack for 15-20 minutes. Put pans in freezer for 15 minutes, then turn cakes out of pans and wrap each layer in 3 layers of plastic wrap to help lock in moisture. Place back in freezer until ready to use.
Lemon Mousse:
1 recipe lemon curd (above)
2.5 tablespoons water
2 teaspoons unflavored gelatin
3 large egg whites
3/8 cup sugar
3/4 cup chilled heavy whipping cream
Place water in small saucepan and sprinkle gelatin evenly over the surface. Let sit until gelatin softens. Place 7/8 cup of the curd into a large bowl and set aside. In another small saucepan, heat the remaining curd over medium-low heat until very warm.
Turn the burner for the gelatin mixture to medium-low, and stir until gelatin dissolves and liquid is clear, being careful not to let it boil. Whisk warm gelatin into the warm curd, then whisk the warm curd into the bowl of cold curd that has been waiting oh-so-patiently.
In a medium bowl, beat egg whites with electric mixer until soft peaks form. Slowly add sugar, continuing to beat until egg whites are thick and glossy. Gently fold this mixture into the curd in 3 additions. Using the same beaters, beat the cream until peaks form. Gently fold this into the curd as well, making sure mixture is smooth. Place mousse into refrigerator until slightly, but not completely, set.
This recipe made twice as much mousse as I needed for my cake...but it's just as great on its own as it is in a cake! I also used it as a cupcake filling a few days later, with the same cake and buttercream because I wanted a taste of this cake for myself! Yum!!
Back to the cake...Remove one frozen cake layer from the freezer, unwrap, and place on a cake board. Top with a generous layer of mousse, spreading to the edges of the cake. Place this layer back in the fridge until mousse is set, then top with second cake layer.
Lemon Mousse:
1 recipe lemon curd (above)
2.5 tablespoons water
2 teaspoons unflavored gelatin
3 large egg whites
3/8 cup sugar
3/4 cup chilled heavy whipping cream
Place water in small saucepan and sprinkle gelatin evenly over the surface. Let sit until gelatin softens. Place 7/8 cup of the curd into a large bowl and set aside. In another small saucepan, heat the remaining curd over medium-low heat until very warm.
Turn the burner for the gelatin mixture to medium-low, and stir until gelatin dissolves and liquid is clear, being careful not to let it boil. Whisk warm gelatin into the warm curd, then whisk the warm curd into the bowl of cold curd that has been waiting oh-so-patiently.
In a medium bowl, beat egg whites with electric mixer until soft peaks form. Slowly add sugar, continuing to beat until egg whites are thick and glossy. Gently fold this mixture into the curd in 3 additions. Using the same beaters, beat the cream until peaks form. Gently fold this into the curd as well, making sure mixture is smooth. Place mousse into refrigerator until slightly, but not completely, set.
This recipe made twice as much mousse as I needed for my cake...but it's just as great on its own as it is in a cake! I also used it as a cupcake filling a few days later, with the same cake and buttercream because I wanted a taste of this cake for myself! Yum!!
![]() |
According to my mom, they're my best cupcakes yet! |
Back to the cake...Remove one frozen cake layer from the freezer, unwrap, and place on a cake board. Top with a generous layer of mousse, spreading to the edges of the cake. Place this layer back in the fridge until mousse is set, then top with second cake layer.
Lemon Buttercream
3 sticks unsalted butter, softened
6 cups powdered sugar
3-4 teaspoons lemon extract
Milk or heavy cream to thin
2 drops yellow gel food coloring
Cream butter in bowl using electric mixer. Add sugar in small batches, adding milk or cream a tablespoon at a time to achieve desired consistency. Add food coloring if desired, and lemon extract.
Use a small amount of icing to crumb coat your cake, and place back in the fridge for 10-15 minutes until icing is set. Frost with remaining icing. I reserved a bit to decorate with, and added a drop or two of yellow food coloring to get a darker frosting for some contrast. Use your imagination! I also topped with fresh raspberries, but you could use any fruit, or none at all.
Enjoy, and let me know what you think!
Tuesday, September 14, 2010
Dulce de Leche Cake
One word. Yum!
I got a call from a friend, the day before Labor Day that went something like this:
Friend: "Want to come over tomorrow for a BBQ?"
Me: "Sure!!"
Friend: "Can you bring dessert?"
Me: "Sure...should have known that was coming!"
So I'd been drooling over a Dulce de Leche cake recipe on one of my new favorite blogs, Spork or Foon, and decided this would be the perfect opportunity to make it. I love trying out big fancy cake recipes on my friends! They loved it..I loved it..Ben loved it so much it ended up on our kitchen floor the day after the BBQ. I was devestated! I'd do just about anything for another bite of that cake..it was the perfect combination of fluffy white cake, creamy dulce de leche filling, and rich caramel buttercream icing.
I used the recipe straight from Spork or Foon, but it was adapted it from several different sources. I'll include those links with each component of the recipe.
Dulce de Leche Cake with Caramel Buttercream Frosting
from SporkorFoon
White Layer Cake adapted from Cook's Illustrated
2 1/4 cups cake flour
1 3/4 cups granulated sugar
4 teaspoons baking powder
1 teaspoon table salt
1 cup milk (original calls for whole, I used 2%)
3/4 cup egg whites (6 large or 8 medium)
1 teaspoon vanilla
12 tablespoons unsalted butter, softened but still cool
Preheat oven to 350 degrees. Prepare (2) 9 inch pans, covering the bottom of each pan with a circle of parchment paper and spraying with nonstick spray. Mix dry ingredients in large bowl with a wire whisk, and set aside. Pour milk, egg whites and vanilla into a smaller bowl and whisk until combined. Add butter to dry ingredients, and mix with electric mixer on medium speed until mixture resembles crumbs. Add all but 1/4 cup of milk mixture, and beat on high speed with hand mixer (medium if you're a bigshot with a stand mixer) for 1 1/2 minutes. Scrape down sides of the bowl, add the remaining milk, and beat for an additional 30 seconds.
Pour batter into pans, filling 2/3 of the way full. Bake cakes at 350 degrees for 23-25 minutes, or until a toothpick inserted into the center of the cake comes out clean. Remove from oven, and cool in pans on wire racks for 20 minutes. Turn layers out of pans onto a baking sheet lined with plastic wrap, and place in freezer for 30 minutes.
Remove from freezer, and wrap each cake in 3 layers of plastic wrap, and place back in freezer until ready to use.
1 14 oz can of sweetened condensed milk
Pour contents of can into large glass bowl, and cover with plastic wrap. Turn back a little of the plastic wrap on one side of the bowl to vent excess steam.
Microwave on 50% power for 2 minutes, remove from microwave and stir with wire whisk. Recover with plastic wrap, and microwave for an additional 2 minutes on 50% power. Stir again, and recover.
In 2 1/2 minute intervals, continue microwaving for 7 1/2-10 minutes. Remove after each 2 1/2 minute interval and stir well. Mixture will bubble up and become thicker and more caramel colored with each stirring.
The original recipe calls for using the full 10 minutes. I did that the first time around, and my milk was cooked too much. The second time around, I stopped at 7 1/2 minutes and had a perfect Dulce de Leche. Since microwaves vary, stop when you feel the consistency and color are right!
The finished product:
![]() |
Perfect, and delicious! I could eat this straight out of the bowl! |
Do not make this frosting until you are ready to use it immediately. It dries very quickly!
1 stick butter, softened
1 cup packed brown sugar (original recipe calls for dark, I used light)
1/3 cup heavy cream
1 tablespoon vanilla extract
16 ounces powdered sugar
Melt butter in small saucepan over medium-low heat. Add brown sugar and cream. Continue cooking until sugar is melted, stirring constantly. Remove from heat and stir in vanilla. Pour into large mixing bowl. Add powdered sugar in small batches while mixing on low speed with electric mixer. Mix until smooth. If frosting is too thick, add 1 tablespoon heavy cream to thin.
Cake Assembly:
Remove first layer from freezer, unwrap, and place on cake board. Level with serrated knife if necessary. Spread a thick layer of Dulce de Leche filling on top of this layer.
Top with second cake layer, and press down. If you have filling squishing out between the layers, run an offset spatula around the edge to smooth. Apply a thin layer of Caramel Buttercream Frosting as a crumb coat, and place the cake in the fridge for 15 minutes to set. This layer of frosting doesn't have to be perfect, or even pretty...It's just there to trap any loose crumbs and keep them from getting stuck in your final layer of frosting!
Set aside frosting for piping, if desired. Use the remaining Caramel Buttercream to frost the top and sides of the cake. Since this frosting dries so quickly, I found it useful to use a heated offset spatula to smooth out the frosting. Run your spatula under hot water, dry, and smooth. Repeat until cake is smooth and pretty! Pipe decorations on top and around the bottom of cake, if desired. I topped mine with a drizzle of caramel, piped chocolate hearts, and a drizzle of melted chocolate. Do whatever makes you happy!
All of the components of this cake are wonderful! Together, they make my favorite cake to date! I've also used the white cake in a few other recipes as well- its light and moist and perfect with any combination of fillings and frostings.
Enjoy, and let me know what you think!!
Friday, September 10, 2010
Quick Sugar Fix! White Cupcakes with Lemon Buttercream
I've been off work for almost two weeks, spending my days home with my 3 1/2 year old son. I love him beyond words, but being a single parent to an incredibly smart and active boy with ADHD can be exhausting. Especially when said child thinks he can thrive on 6 hours of sleep a night! The last few days have been especially trying- for both of us I'm sure- I'm ready to go back to work, and I'm sure he's ready to go back to "school".
I was feeling
![]() |
The only time he's ever used the bean bag, other than to climb on...and the mess is still there! Argh! |
I was craving something sweet, but not too heavy. I decided to remake the cake portion of a recipe I made over the weekend, except as cupcakes..and with a Lemon Buttercream frosting instead of the super rich caramel frosting that was on the Dulce de Leche cake I made for the Labor Day BBQ I went to. (I'll post that cake as soon as my lovely friend Kaytie sends me the pics...my cell pics don't do that cake justice!)
This is my new favorite white cake recipe! It's light, moist, bakes evenly....it's lovely! It worked well in the Dulce de Leche cake, and worked just as well for these cupcakes. I baked 12, froze the rest of the batter, and wrapped 6 of the cupcakes up and stuck them in the freezer as well for the next time I need a quick fix!
White Cake adapted from Sporkorfoon, who adapted it from Cook's Illustrated
2 1/4 cups cake flour
1 3/4 cups granulated sugar
4 teaspoons baking powder
1 teaspoon table salt
1 cup milk (original calls for whole, I used 2%)
3/4 cup egg whites (6 large or 8 medium)
1 teaspoon vanilla
12 tablespoons unsalted butter, softened but still cool
Preheat oven to 350 degrees. Prepare pans- will make 2 9-inch layers, or approximately 30 regular sized cupcakes. Mix dry ingredients in large bowl with a wire whisk, and set aside. Pour milk, eggwhites and vanilla into a smaller bowl and whisk until combined. Add butter to dry ingredients, and mix with electric mixer on medium speed until mixture resembles crumbs. Add all but 1/4 cup of milk mixture, and beat on high speed with hand mixer (medium if you're a bigshot with a stand mixer) for 1 1/2 minutes. Scrape down sides of the bowl, add the remaining milk, and beat for an additional 30 seconds.
Pour into pans or prepared muffin tins, filling 2/3 of the way full. Bake cakes at 350 for 23-25 minutes, cupcakes for 18 minutes.
Lemon Buttercream Icing (didn't follow a recipe, just threw together a few things and was lucky that it turned out well!)
**I was only icing 6 cupcakes, so increase measurements accordingly for larger batches**
1/2 stick unsalted butter, softened
2 cups powdered sugar
1 teaspoon lemon extract
2-3 tablespoons of milk
2 drops yellow gel food coloring
Cream butter in bowl using electric mixer. Add sugar in small batches, adding milk a tablespoon at a time to achieve desired consistency. Add food coloring if desired, and lemon extract. Decorate however you see fit at the time- for me, it was colored sanding sugar!!
Enjoy!
Saturday, September 4, 2010
Cupcake Decorating: Hydrangeas
I saw a tweet last week about Hydrangea cupcakes, and I had to check it out. Hydrangeas are one of my favorite flowers, especially the bi-colored variations! I read the post over on Glorious Treats, and I was surprised at how simple this technique really is! I couldn't wait to try it. When I made my Raspberry Filled Cupcakes with Raspberry Buttercream earlier in the week, I saved a few so I could try this technique out for myself. I set aside some of my buttercream before I added the raspberry puree so I could try the bi-color look using pink and white frosting. Not too shabby for the first time around! Definitely check out the post on Glorious Treats, she gives a great tutorial on how to pull this off.
I'll definitely try this again!
Enjoy!!
Tuesday, August 31, 2010
Happy Birthday Miles Away
I made these cupcakes today, just because. I have a 3 1/2 year old literally bouncing off the walls..the floor..the ceiling and everything in between. Baking is calming to me, so I decided to see what I could make with what I had in my kitchen to get my mind of the disaster area that is my living room.
I had leftover Raspberry puree from one of the cakes I made for my friends' wedding reception a few weeks ago, (Kaytie and Arni's cake) so I decided to make vanilla cupcakes with raspberry filling and raspberry buttercream. Yum! They turned out great!
Someone very close to me (but who happens to be very far away right now) is celebrating their birthday this Friday. Unfortunately, they'll be celebrating alone...If I could get these cupcakes there and have them taste good, I'd do it in a heartbeat. So Happy Birthday..I'll be thinking of you, and enjoying your cupcakes!!
On another note, I found out about a cool Betty Crocker giveaway over at one of my new favorite blogs, Family Fresh Cooking. She's giving away a goodie bag full of Betty Crocker baking utensils, as well as a cookbook. Who wouldn't like that? Check it out!
Vanilla Cupcakes adapted from The Novice Chef Blog
1 stick unsalted butter, at room temperature
2/3 cup sugar
3 large eggs
1 1/2 teaspoon vanilla extract
1 1/2 cups all purpose flour
1 1/2 teaspoon baking powder
1/4 teaspoon salt
1/4 cup milk
Preheat oven to 350 degrees. Place 12 cupcake liners in a muffin tin. In a large bowl, beat butter and sugar with electric mixer until light and fluffy (approximately 2 minutes.) Add eggs, one at a time, beating well after each egg is added. Add vanilla and mix well.
In another bowl, combine dry ingredients and whisk to combine. Add dry ingredients to wet in 3 batches, alternating with milk, beating well on low speed after each addition. Fill cupcake liners 2/3 full with batter, and bake for 17 minutes, or until toothpick inserted in the center of a cupcake comes out clean.
Remove from oven, and cool completely before filling and frosting.
Raspberry filling: ( this will make enough to fill a 3 layer cake, and then some. I froze the leftovers and used for both the filling and frosting for these cupcakes)
10 oz raspberries, fresh or frozen
1/4 c. sugar
1 tbsp cornstarch
Rinse or defrost raspberries, and combine in blender with sugar and cornstarch. Blend until smooth. If seedless filling is desired, press through mesh strainer to remove seeds.
Raspberry Buttercream
1 stick butter, softened
2 cups powdered sugar
1 teaspoon vanilla extract
3 tablespoons raspberry filling
In a large bowl, beat butter with electric mixer until light and fluffy. Add 1 cup sugar, and beat on low until smooth. Add raspberry filling and vanilla, and beat until well combined. Add the rest of the sugar and beat until smooth. Add more sugar if you desire thicker frosting, or if you feel it needs to be thinned add a teaspoon of heavy cream or milk.
![]() |
Happy Birthday!! |
Enjoy, and let me know what you think!
Saturday, August 28, 2010
Snickers Cupcakes
![]() |
Snickers Cupcakes- Heaven in a cupcake wrapper |
I saw a recipe on The Novice Chef Blog for 100 Grand Cupcakes, and they looked amazing. I wasn't able to get my hands on the mini 100 Grand bars for the first batch, so I went for Snickers. The thing that excited me most about the recipe was the Salted Caramel Buttercream, and that works well with either candy bar.
Snickers Cupcakes adapted from 100 Grand Cupcakes at The Novice Chef Blog
Makes 30 regular sized cupcakes
2 cups sugar
1-3/4 cups all-purpose flour
3/4 cup cocoa powder
1-1/2 teaspoons baking powder
1-1/2 teaspoons baking soda
1 teaspoon salt
2 eggs
1 cup milk
1/2 cup vegetable oil
2 teaspoons vanilla extract
1 cup boiling water
10 snack size Snickers bars, cut into thirds and frozen
3-4 snack size Snickers bars, chopped for topping
Preheat oven to 350°F and line muffin tins with cupcake wrappers.
Combine sugar, flour, cocoa, baking powder, baking soda and salt in large bowl and stir with wire whisk. Add eggs, milk, oil and vanilla and mix with an electric mixer on medium speed for 2 minutes. Stir in boiling water (batter will be very runny).
Fill muffin tins 2/3 full with batter. Place in oven for about 8 minutes, remove trays and insert 1 candy piece into each cupcake. Place trays back in the oven for approximately 16 minutes.
Recipe Adapted from: Hersheys
Salted Caramel Buttercream Frosting
3 sticks unsalted butter; room temperature
3 teaspoons pure vanilla extract
1 1/2 pounds confectioners’ sugar
1/2- 2/3 cup caramel topping depending on taste; plus more for drizzling
1 1/2 teaspoon salt
Cream the butter in the bowl of an electric or stand mixer. Add the vanilla extract, salt and caramel syrup and combine well.
Add sugar in small batches, mixing well and scraping bowl after each addition. After all of the sugar has been added and mixed thoroughly, taste the frosting and add more caramel syrup if desired. For thicker frosting you can gradually add in a little more sugar.
Garnish with chopped Snickers bars and a drizzle of caramel of caramel syrup.
Enjoy..and let me know what you think!
3/4 cup cocoa powder
1-1/2 teaspoons baking powder
1-1/2 teaspoons baking soda
1 teaspoon salt
2 eggs
1 cup milk
1/2 cup vegetable oil
2 teaspoons vanilla extract
1 cup boiling water
10 snack size Snickers bars, cut into thirds and frozen
3-4 snack size Snickers bars, chopped for topping
Preheat oven to 350°F and line muffin tins with cupcake wrappers.
Combine sugar, flour, cocoa, baking powder, baking soda and salt in large bowl and stir with wire whisk. Add eggs, milk, oil and vanilla and mix with an electric mixer on medium speed for 2 minutes. Stir in boiling water (batter will be very runny).
Fill muffin tins 2/3 full with batter. Place in oven for about 8 minutes, remove trays and insert 1 candy piece into each cupcake. Place trays back in the oven for approximately 16 minutes.
Recipe Adapted from: Hersheys
Salted Caramel Buttercream Frosting
3 sticks unsalted butter; room temperature
3 teaspoons pure vanilla extract
1 1/2 pounds confectioners’ sugar
1/2- 2/3 cup caramel topping depending on taste; plus more for drizzling
1 1/2 teaspoon salt
Cream the butter in the bowl of an electric or stand mixer. Add the vanilla extract, salt and caramel syrup and combine well.
Add sugar in small batches, mixing well and scraping bowl after each addition. After all of the sugar has been added and mixed thoroughly, taste the frosting and add more caramel syrup if desired. For thicker frosting you can gradually add in a little more sugar.
![]() |
Waiting for the finishing touches |
Garnish with chopped Snickers bars and a drizzle of caramel of caramel syrup.
![]() |
The cooker boy (excuse the MJ glove) with his cupcake..one happy camper!! |
Enjoy..and let me know what you think!
Sunday, August 8, 2010
Awesome cakes for awesome friends! Part One..
These are my awesome friends, Kaytie and Arni. Kaytie and Arni got married in Iceland (Arni's home country) a few weeks ago. Aren't they gorgeous?? Seriously, i think they moonlight as models!
While the wedding and reception were in Iceland, obviously not everyone could make the trip with them- so they held another reception last night, complete with the wedding dress and suit..like I said, absolutely gorgeous!
The food was great, pulled pork and ribs provided by Kaytie's dad..The man knows how to cook! Instead of having another wedding cake, a bunch of friends and family pitched in and provided a dessert buffet. This is where my cakes come in! I love to bake, I love my friends, I love to bake for my friends..so it was a no-brainer! I'd made an awesome (if i do say so myself) chocolate cake for Kaytie's birthday a while ago, so I offered to make it again (with some improvements and additions) along with another cake as well.
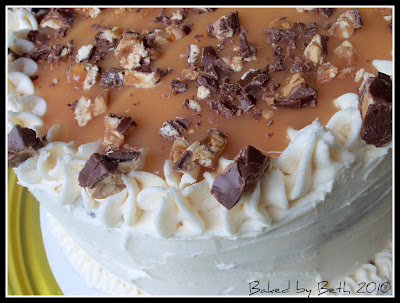
I made a Chocolate Cake with Raspberry Filling, Chocolate Ganache and Chocolate Buttercream topped with White Chocolate shavings, as well as a White Cake with Chocolate Ganache Filling and Tiramisu Buttercream. I'll post one recipe today, and be back later with the other recipe as well as directions for assembling the cakes.
![]() |
My contributions to the dessert buffet |
Chocolate Cake with Raspberry Filling, Chocolate Ganache and Chocolate Buttercream
Cake and Raspberry filling
Adapted from Love and Olive Oil :
I made three (3) 8-inch layers, which provided about 18 servings.
3 ounces semisweet chocolate chips
1 1/2 cups hot brewed coffee
3 cups sugar
2 1/2 cups all-purpose flour
1 1/2 cups unsweetened cocoa powder (not Dutch process)
2 teaspoons baking soda
3/4 teaspoon baking powder
1 1/4 teaspoons salt
3 large eggs
3/4 cup vegetable oil
1 1/2 cups well-shaken buttermilk (or mix 1 1/2 cups milk with 1 tablespoon vinegar and let curdle)
3/4 teaspoon vanilla
Preheat oven to 300 degrees, and prepare your pans. I use Bakers Joy spray, and line the bottom of my pans with circles of parchment paper to ease in removing the cakes from the pans.
Pour the hot coffee over the chopped chocolate, and stir until chocolate is melted. I love this part, and I don't drink coffee!
Combine dry ingredients in a large bowl, and stir with wire whisk to assure they're combined.
In a second large bowl, beat eggs with mixer until they're thickened a bit, and have a nice light yellow color. Add the buttermilk, chocolate-coffee mixture, oil and vanilla slowly and beat until combined. Slowly add dry ingredients while beating on medium speed. Continue to beat until combined.
Divide the batter between your prepared pans- if using 8 inch pans, they'll be about half full.
Bake for approximately 35-40 minutes, or until a toothpick inserted into the center of the cake comes out clean. Remove from oven, and place pans on cooling rack. Once cool, turn cakes out of pans onto cooling racks, remove parchment paper and cool completely. Attempting to turn them out too soon results in a broken layer..Another lesson learned the hard way!!
Raspberry filling:
10 oz raspberries, fresh or frozen
1/4 c. sugar
1 tbsp cornstarch
Rinse or defrost raspberries, and combine in blender with sugar and cornstarch. Blend until smooth. If seedless filling is desired, press through mesh strainer to remove seeds. I leave the seeds in my filling.
I made a boo-boo and forgot to heat my filling, so it wasn't thick..but it still tasted great and worked well in the cake. If you're good at reading directions, like I very obviously am not, then go ahead and heat your filling over medium heat until it boils. Stir constantly. This, you direction followers, thickens the filling!!
Chocolate Ganache
From Savory Sweet Life
12 oz semisweet chocolate
1 1/2 cups heavy cream
Heat cream over medium high heat until it begins to boil. Immediately pour over chocolate chips in a medium sized bowl. Let sit for a minute or two, then stir until smooth. For a spreadable consistency, refrigerate for approximately 30 minutes, removing from fridge occasionally to stir and check consistency.
Chocolate Buttercream
Adapted from Savory Sweet Life
2 cups (4 sticks) unsalted butter, at room temperature
6 cups powdered sugar
1 tsp salt
1/2 tbsp vanilla
4 tbsp heavy cream
1/8 cup cocoa powder
Beat butter with mixer until creamy. Add powdered sugar, a little at a time (again to avoid the massive white sugar cloud in the kitchen..no contact highs for my little guy..Sorry Ben!) until combined. Add vanilla, cream, cocoa powder and salt, and beat on medium speed until frosting is nice and fluffy. If you want a thicker consistency, add more powdered sugar. If you prefer thinner frosting, add more cream.
Enjoy, and let me know what you think!!
Beth
Tuesday, August 3, 2010
The Cooker Boy wants Strawberry Cupcakes
![]() |
The cooker boy's Strawberry Cupcakes |
Ben ( aka The Cooker Boy) has been hounding me to make cupcakes lately, so I gave in last night. I asked him what kind of cupcakes he wanted, and the answer was Strawberry with pink icing, because pink is a color for boys and girls. Can't argue that, there are grown men wearing pink, and I don't want to give the kid a complex.
I compromised, and tried a new yellow cake recipe and improvised my way to Strawberry Buttercream. We were both happy with this decision! I wasn't so sure if adding strawberries to the buttercream would work well or not, but the result was a nice Pink frosting (yay Ben) with nice bits of strawberry and an amazing flavor! The cake was lacking something, possibly from the ommission of butter flavoring and the fact that i substituted cream for the milk. Like i said, I improvise. A lot. With what I have on hand. Overall, I was pleased with how the cupcakes turned out...Here you go!
Moist Yellow Cake from Bakerella
1 cup (2 sticks) butter, room temperature
2 cups sugar
4 eggs, room temperature
3 cups sifted self rising flour
1 cup whole milk
1 teaspoon pure vanilla extract
1/2 teaspoon butter flavoring
Preheat oven to 350 degrees. Grease and flour 3 8-inch cake pans, or use cupcake tins if desired.
Using a mixer, cream butter until fluffy. Add sugar, and continue to cream for about 7 minutes. Add eggs one at a time, mixing thoroughly after each egg. Add flour and milk to creamed mixture, starting and ending with flour. Add vanilla and butter flavoring until just mixed.
Divide batter between pans, or cupcake tins. For the 8 in cakes, bake 25-30 minutes. For my cupcakes, 18 minutes worked well. Cool in pan 5-10 minutes.
Remove cakes from pans, and immediately wrap in plastic wrap to seal in moisture. Cool completely on wire racks. ( Didn't do this...wrapping 30 cupcakes seemed like a pain..but next time will try with cakes, I'm interested to see how this turns out)
Strawberry Buttercream Frosting adapted from Savory Sweet Life
1 cup butter ( 2 sticks), softened
3 cups powdered sugar, sifted
1/2 teaspoon salt
1 tablespoon vanilla extract
2 tablespoons milk or heavy cream
handful of strawberries, washed, hulled and pureed
Beat butter with mixer until creamy. Add powdered sugar a little at a time to prevent the massive white cloud of sugar in your kitchen. Once the sugar and butter are mixed and creamy, add
salt, vanilla and milk/cream until just mixed. If the frosting isn't at your desired consistency, add more sugar to thicken or more milk/cream to thin. When you've got your desired consistency, fold in strawberries gently.
Here's the Cooker Boy enjoying his treat, after licking all the frosting off the cupcake...
Enjoy!! Let me know what you think..
Subscribe to:
Posts (Atom)